📸 Swift Camera — Part 2
Use custom camera view to take pictures and save it to photos album
 Photo credit: Unsplash
Incase this is your first time here, you can go ahead read the part 1. Believe me — it would only take you 4 mins to read it. I explained in detail about “How to create custom camera view using AVFoundation
As usual, to all those nerds who wants to see the code in action and skip this post. Here is your Github repo link. Everything I am gonna discuss is already in that repo master branch.
For others who want to learn before diving into code,
Let’s take pictures with our custom camera
Before you dive in, you need the code from Part 1. You can find it in this Github branch. Below steps will use the part 1 view controller and add a feature to taking pictures.
Step 1
Select Main.storyboard, drag UIButton to our view controller, give it a nice title like “Snap a photo” and set constraints. Make sure button is on top of the preview view like below.
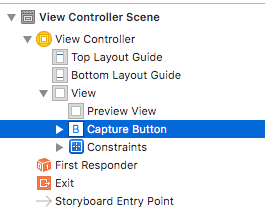
Main.storyboard ViewController structure
Set below constraints for our button, So that it will be in correct position.
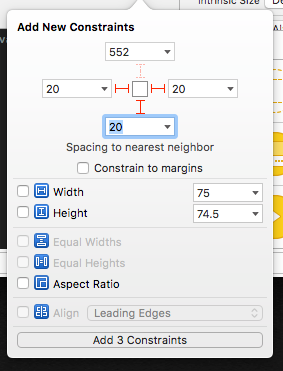
Capture button constraints
Here, I’m adding leading, trailing and bottom constraints to our capture button. So that our button will be placed the bottom of the screen.
Control + drag our button to ViewController.swift and create an IBOutlet action like below. This function will be called when we tap the capture button.
@IBAction func onTapTakePhoto(_ sender: Any) {

}
Step 2
Create below instance variable in our ViewController.
var capturePhotoOutput: AVCapturePhotoOutput?Here capturePhotoOutput helps us to snap a photo from our capture session. It has also provided lots of modern interface for capturing still photo, Live photo, wide-gamut colour including the variety of formats. To simplify this post, we are going to take still image from our capturePhotoOutput.
Step 3
Create an instance of AVCapturePhotoOutput in our viewDidLoad method inside do…catch loop and add it to our session as output like below.
// Get an instance of ACCapturePhotoOutput class
capturePhotoOutput = AVCapturePhotoOutput()
capturePhotoOutput?.isHighResolutionCaptureEnabled = true

// Set the output on the capture session
captureSession?.addOutput(capturePhotoOutput)
AVCapturePhotoOutput has lots of properties to control how the capture workflow should work. But we are just enabling High resolution capture here.
Step 4
Create and configure Photo Settings in our onTapTakePhoto function like below.
// Make sure capturePhotoOutput is valid
guard let capturePhotoOutput = self.capturePhotoOutput else { return }

// Get an instance of AVCapturePhotoSettings class
let photoSettings = AVCapturePhotoSettings()

// Set photo settings for our need
photoSettings.isAutoStillImageStabilizationEnabled = true
photoSettings.isHighResolutionPhotoEnabled = true
photoSettings.flashMode = .auto

// Call capturePhoto method by passing our photo settings and a
// delegate implementing AVCapturePhotoCaptureDelegate
capturePhotoOutput.capturePhoto(with: photoSettings, delegate: self)
Here, create an instance of AVCapturePhotoSettings and set some photo settings like image stabilisation, high resolution photo and auto flash mode.
Then, call capturePhoto method from capturePhotoOutput instance and pass our photo settings with self as delegate. This will allow us to take a still image from our custom camera.
Step 5
AVCapturePhotoCaptureDelegate methods gives us lots of control over a photo capture output. To simply our needs we will use this below method to get the captured image.
photoOutput(_:didFinishProcessingPhoto:previewPhoto:resolvedSettings:bracketSettings:error:)
Create an extension for ViewController and extends from AVCapturePhotoCaptureDelegate like below
extension ViewController : AVCapturePhotoCaptureDelegate {
    func capture( captureOutput: AVCapturePhotoOutput,
                  didFinishProcessingPhotoSampleBuffer photoSampleBuffer: CMSampleBuffer?,
                  previewPhotoSampleBuffer: CMSampleBuffer?,
                  resolvedSettings: AVCaptureResolvedPhotoSettings,
                  bracketSettings: AVCaptureBracketedStillImageSettings?,
                  error: Error?) {
        // get captured image
}
didFinishProcessingPhotoSampleBuffer gives us the captured photo buffer ,preview buffer and resolved photo settings.
// Make sure we get some photo sample buffer
guard error == nil,
    let photoSampleBuffer = photoSampleBuffer else {
        print("Error capturing photo: \(String(describing: error))")
        return
}

// Convert photo same buffer to a jpeg image data by using // AVCapturePhotoOutput
guard let imageData =
    AVCapturePhotoOutput.jpegPhotoDataRepresentation(forJPEGSampleBuffer: photoSampleBuffer, previewPhotoSampleBuffer: previewPhotoSampleBuffer) else {
        return
}

// Initialise a UIImage with our image data
let capturedImage = UIImage.init(data: imageData , scale: 1.0)
if let image = capturedImage {
    // Save our captured image to photos album
    UIImageWriteToSavedPhotosAlbum(image, nil, nil, nil)
}
Here, we are getting only photoSampleBuffer. Need to convert it to a jpeg image data. To do that we can use jpegPhotoDataRepresentation method from AVCapturePhotoOutput which will take photo sample buffer and preview photo same buffer as input and gives us JPEG image data.
To save our captured image to photos album, again we need to convert our image data to UIImage . So initialise an UIImage by passing our jpeg Image Data and scale of 1.0.
Finally, use UIImageWriteToSavedPhotoAlbum method and pass our image to be saved in photo album.
Step 6
if you run the app in a real device, it might crash now by giving below message.
 Console message on Crash
You guessed it correct! we need to add “Privacy — Photo Library Usage Description” in our plist. Since we are saving the image to photo library.#
EDIT from future
To prevent crashes on iOS 11, “Privacy — Photo Library Additions Usage Description” in info.plist with a usage description (string) should be added.
Thanks to Ingrid Silapan for pointing this out!
Now if you hit run and click the button at the bottom. You will hear a sound indicating the camera is taking picture. Go ahead and check in your photos app to verify the captured image is actually saved or not.
There are lots of things I haven’t included here. So I am trying to list as much as possible below.
AVCapturePhotoOutputclass supports only from iOS 10 and above. So if you are targeting any iOS below then 10. You should be checking out[AVCaptureStillImageOutput](https://developer.apple.com/documentation/avfoundation/avcapturestillimageoutput)[didFinishProcessingPhotoSampleBuffer](https://developer.apple.com/documentation/avfoundation/avcapturephotocapturedelegate/2873949-photooutput)is deprecated from iOS 11. But you can usedidFinishProcessingPhotomethod fromAVCapturePhotoOutputDelegateto achieve the same for iOS 11- The reason these photo taking API’s from Apple is deprecated and added for every major release is that every major iOS release is included with lots of feature for photo capture. Do you know that you can take the RAW image file and save it as DNG and can be edited with your favourite photo editing app without losing any image data? Yes, its possible from iOS 10
AVCapturePhotoOutputis so powerful that we need to take a bit more time to avoid errors. I would suggest reading more on “Photo Capture programming guide”- To save image to photos album we have used
UIImageWriteToSavedPhotoAlbummethod. But if you want more control over saving photos, you need to check out[PHPhotoLibrary](https://developer.apple.com/documentation/photos/phphotolibrary)Since photos app is become so powerful, starting from iOS 8 now we have more control over Photo Library as well. - Having a “Snap a photo” button seems to be old-school. So I created a rounded white background button and the same code is available in Github repo.
On next part, I will write about detect QR code or Face from our custom camera view. Follow me here or on twitter to get updates. If you like this post please share and recommend.